Thursday, December 24, 2009

Merry Christmas to all!


I'm looking forward to this wonderful few weeks, celebrating the birth of my Savior, with my family. I'll see you all after the new year!

Thursday, December 17, 2009

Show and Tell! Figgy Pudding Table Runner

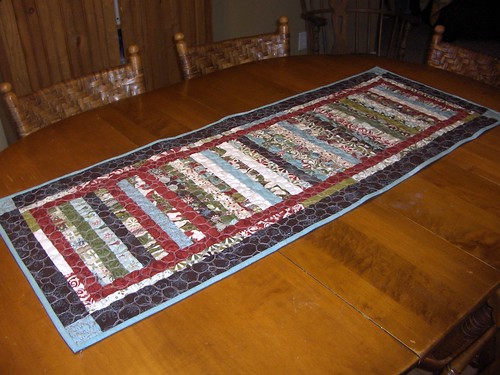
I was so excited that I not only had enough fabric from one Honey Bun to make all 5 of our families Christmas stockings (check them out a few posts down), but I had enough to make a table runner to match! I also had a few bits left of the tone on tone FQ's and really just added borders until I was out of fabric :)
I was loving the results......... until I started quilting it. I thought this might be a good opportunity to experiment with sketchy pebble quilting because it's a small project. Let me tell you, it takes a LONG time to pebble quilt! My circles were a little, ahem, "sketchier" than I wanted and I didn't like the white thread on the chocolate brown. I did, at one point, decide to take the stitching out, but that lasted about 10 minutes and I realized that was near impossible and I forged on.
We'll chalk this one up to live- and- learn and you know now that it's on the table, I'm warming up to it :)

Please take the time to peruse the other Show and Tell's hosted by Piece N' Quilt!


About 6 weeks ago, I participated in a scrap challenge over at The Handmade Dress. Remember these candy canes?

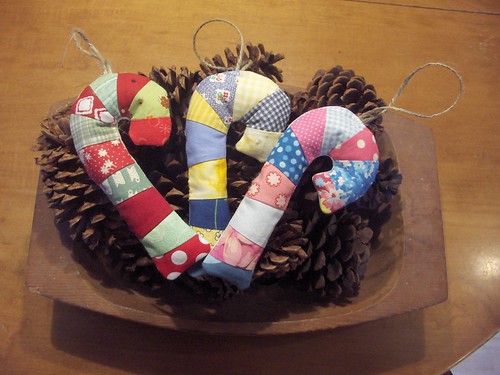
The goal was to make a project using scraps without buying anything new. I was right in the middle of the crazy craft show rush, but I took an afternoon out to make them. I think I needed a break, anyway :)

Jennifer from the CraftSanity podcast was the judge. I was pretty excited to hear this. I LOVE her podcast! Anyway, the news is.....I WON! I was pretty honored because there were some awesome entries. Thanks, Samantha for hosting and Jennifer for judging. Samantha gave me a $25 GC to her store and here is what I chose....


I've had my eye on that Miss Madeline pattern for a loooooong time. Alas, my 13 yo daughter is not interested in wearing it, so it sat on my wish list. I chose the little girl size so I'm able to make baby shower gifts. I can't wait to try it out!

Wednesday, December 16, 2009

Dear Santa,

I'm not sure if I needed to be naughty or nice this year to receive a package full of Grunge, but I can show documentation to prove either one :) This is what I would just LOVE to see under my tree! Just think of the uses!


Basic Grey Grunge Basics-just a little 1/2 yard of each would be fine.


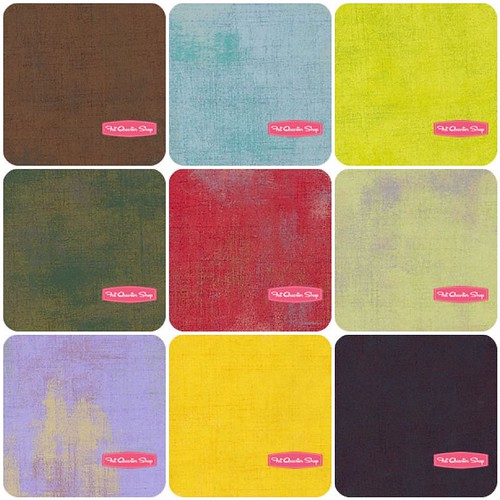
And if it isn't asking too much....a little more Figgy Pudding. a Jelly Roll, really. I can't get enough of that stuff. Besides, it matches my living room oh, so well.

If you'd like to write your own letter to Santa, I hear that Fat Quarter Shop's Jolly Jabber can make sure that he sees it :)

Wednesday, December 9, 2009

Family stockings with a little how-to


Family Stockings, originally uploaded by myittybittyquilts.

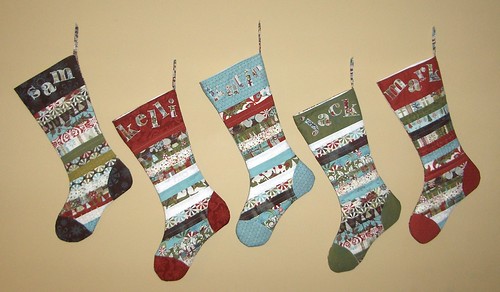
And here is the whole lot of them and as I promised I'll give you the low down on how I made them.

This is not a tutorial, really and I'm assuming you understand basic sewing terms and instructions :)

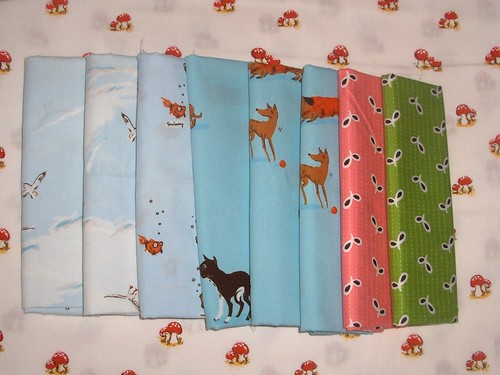
I started with a HoneyBun of the Figgy Pudding Line by Moda. And 5 quarter yard cuts of tone on tones from that line.

I sewed the HoneyBun strips all together and ended up with a piece of strippy fabric about 41x 45".

I found a stocking shape that I liked (I used one from New Noel) and figured out how big I wanted the contrasting fabric at the top for the "cuff" (It's not a cuff at all) I printed out the family names on my computer and used that to determine the size. Then I cut out the stockings from the stripped fabric, minus the "cuff".

I cut out the "cuffs" from the contrasting fabric, then used fusible web to attach the letters and used a small zigzag in white to stitch them down.

Next, I sewed the appliqued "cuff" to the stocking body. It was at this point that I decided to add the heel and the toe, so I went back to my fusible web and drew those shapes. Then appliqued them on using matching thread, also with a small zigzag.

I then used spray adhesive to attach the stockings to some Warm and Natural. I quilted these with just a straight stitch down each strip. I debated a LONG time about this, but I'm happy with the results. Then I trimmed them.

At this point, I used the stocking to cut out two pieces of lining. (I just used a plain white)

After they were quilted I cut out rectangles of Warm and Natural and backing fabric just slightly larger than the stocking. (This is my new method for sewing layered, shaped things together. A little wasteful, maybe, but I don't have any trouble with my seams catching everything in) Then I layered batting, backing right side up, stocking right side down and pin. I sewed around the stocking, all but the top, trimmed and turned right side out.

Now I sewed the lining pieces together, leaving a 4" opening for turning.

I needed a tab for hanging so I cut 5 pieces about 3" by 8". Folded in half lengthwise, opened up, folded the edges to the middle and ironed, then folded in half again. You know how to do this :) Top-stitched and tacked, using a zigazg stitch, onto the outside of the stocking facing DOWN.

Next, I slipped the stocking inside the lining, right sides together and sewed around the top. Flipped the whole thing out through the opening in the lining. Stitched the opening closed by machine and voila! Done!

I don't know if anyone will be inspired to try this, but if you have any questions, as I'm sure I didn't make this super clear, feel free to ask!

Oh, there was also enough of the stripped fabric left over to make a table runner. It's pieced and ready to be quilted. I think I'll save that for Holiday Show and Tell!

Monday, December 7, 2009

And the Winner Is....

sarah in the woods!

sarah in the woods said...

Lovely! Thanks for the opportunity.
I'm making a forest-themed advent calendar. Love the mushrooms!!

I'll have to check out your advent calendar. Sounds wonderful!

I'll be getting in touch with you and thank you all for visiting my little blog :)

Saturday, December 5, 2009

New Stockings for the Family aka I LOVE Figgy Pudding!


I've had this lovely Honey Bun of Figgy Pudding, along with some coordinating FQ's since June. I knew they were destined to be Christmas stockings and yet, with the Quilt show and craft show, I had to just set it up on my shelf. Nope, I couldn't even leave it out to gaze at, lest I toss my then current project and immerse myself in it's yumminess. Finally, this week, I could get out that bag and get started and to tell you the truth, I didn't want to quit! Stay tuned for more FP projects along with some basic instructions on how I put these together. I just couldn't wait to show you a peek :)

Tomorrow is the last Giveaway Day! Check the next post for info :) You could win this......


Tuesday, December 1, 2009

Yippee! It's Giveaway Day!!


and the gift I'd love to send one of you is one FULL, YUMMY YARD of Heather Ross Mushrooms on white!! To enter the give-away, just leave a comment and let me know something that you are making this Christmas season. I love handmade gifts of all sorts and always ready for some new ideas, so inspire me! The winner will be drawn at random on December 6 and I'll have the fabric in the mail to you in plenty of time if you'd like to use it for gifts :) Oh, and for my one non-fabric loving reader (Hi, Jude!) if you comment and win, I'll send you something nifty that you don't have to sew into anything :P
Please leave a way for me to contact you in your post. Thanks for visiting and go visit the other giveaways sponsored by www.sewmamasew.com


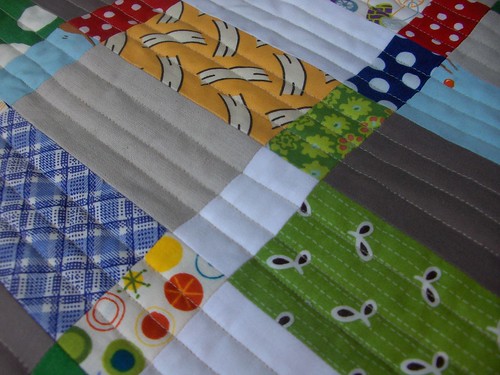
And yes, I was just playing with the super macro setting on my camera. A photographer I am not...

Kid's Stuff

Floppy Frogs


Boxy Bags

Burp Cloth Sets

Wristlets

Coloring Totes

Chenille Bibs

Nope, no clever title. I just wanted to show a few of the kids' things I've been sewing. Some of it was for the craft show (which went really well!) and some of it is for gifts.

***Check back tomorrow, it's GIVEAWAY DAY!!***


Monday, November 30, 2009

More baby quilts and no babies


I'm not sure why I feel compelled to continue to sew baby quilts. I guess I like the size and MAN, all the cute fabrics and color combos! I tell myself it's great to have some on hand to gift when the occasion arises. Yeah, let's go with that...


Sorry for the yucky pictures. A new camera is still on my wish list....

Friday, November 20, 2009

#23

I've still been busy sewing, sewing, sewing for my upcoming craft show NEXT weekend! If my mom and sis weren't helping me out, I think I'd be having a nervous breakdown right about now. I've done a few shows with my handmade soaps and stuff, but this is my first show that I've sewn for. It's SO hard to know what people might buy and how to price it. I have given myself a deadline of next Tuesday and whatever hasn't been completed by then is not going to be done this year. That will give me time to wrap, label and just enjoy the holiday weekend.
I wish I had a picture to post of some of the goodies, but they'll be coming soon :)

In the meantime, check out this giveaway!

Tuesday, November 10, 2009

It's a Block Party!


BlockParyMosaic, originally uploaded by myittybittyquilts.


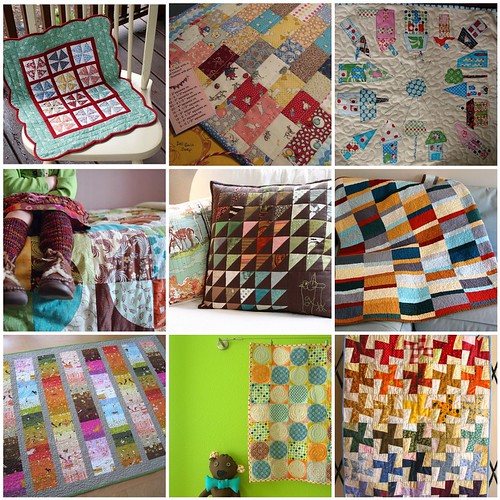
1. String Blocks, 2. Forest Pillows, 3. Strips and Bricks Quilt - Quilted, 4. Fishy Quilt, 5. Beaded Curtain Quilt - Kaffe Fassett design, 6. Hello Betty, 7. Kathy's VQB Block (I think), 8. nettieblock, 9. anchors away, 10. neptune hexagons!, 11. In the shop, 12. color wheel

I can't even begin to tell you how excited I am to be a part of an online Quilting Bee! I've been drooling over many other bloggers creations for each other, but I've never been able to take a part. I was mulling over the idea of inviting a few friends to start my own, but when I saw that the Block Party blog started a flickr group, I rushed over and found many Bees starting up. I've had the chance to check out my fellow quilters blogs and flickr sets and I'm even more stoked! I think we have an excellent group!
I spent a little (too much) time on flickr this morning whilst the little guy watched Little Einsteins and created this mosaic of recent faves :)

Friday, October 30, 2009

Scrappy Candy Canes


Scrappy Candy Canes, originally uploaded by myittybittyquilts.

Yeah, I have A LOT to do to get ready for the upcoming craft show, but instead of doing anything I HAD to do, I did something just for fun :)
Samantha, over at the handmade dress, is having a little "use your scraps" game. Hmmm...I might have a scrap or two (thousand) I wanted to come up with a project that used my tiniest pieces and here is what I came up with. I must have Christmas on my mind! I think the traditional red/green is my favorite, but the maize and blue one might be a close second (Go Wolverines!)

Monday, October 26, 2009

True Up


I'll admit that I have a REALLY long list of blogs that I regularly check. I could get so much more accomplished if I spent half of the time on the computer that I usually spend! I wouldn't be half as inspired, though. So, it's definitely a trade-off....so I tell myself.

One of those constantly inspiring ones is True Up. Have you checked it out yet? Fabric sales, updates, vintage swatches. If you get all swoony over fabric, you'll adore it!

And I'm not just saying that because they are doing a give-away right now. Well, that was my inspiration, but I promise I wouldn't say those nice things if I didn't believe them.

Sunday, October 25, 2009

WIP- Prairie Points


WIP- Prairie Points, originally uploaded by myittybittyquilts.

Just a little glimpse of what I'm working on currently. I haven't worked with prairie points before so it's definitely a learning process. Stay tuned for the finished quilt...

Saturday, October 24, 2009

Fall Doll Quilt Swap


FallDollQuiltSwap, originally uploaded by myittybittyquilts.

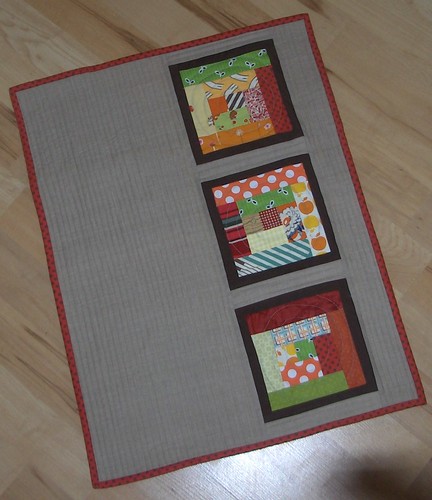
I know, I know, I have shown A LOT of doll quilts lately! I've had a few swaps that I've needed to finish up, so that's what I've been busy sewing! This one is for a doll quilt swap at www.sewingmamas.com. I had seen a quilt similar to this on flickr quite a while ago and was itching to make something like it!
Just simple log cabin blocks framed in chocolate brown set in a taupe linen-look fabric. The taupe is super soft and I wish I could have bought the entire bolt of the stuff! Bound in one of my current favorite fabrics, chocolate dots on red from MoMo's Wonderland.
I quilted a swirl in each log cabin then finished it up with some organic straight line quilting.

Saturday, October 17, 2009

Authentic Tote Bags


AuthenticToteBags, originally uploaded by myittybittyquilts.

I just loved this line of fabrics (Authentic by Sweetwater for Moda) as soon as I saw it. I couldn't think of any projects I needed it for, though, unfortunately. UNTIL, I saw it in a 54" wide home dec panel. I knew I NEEDED a tote bag (yeah, right) ok...ok...I WANTED a tote bag from it. I purchased a yard and was able to make two. I've sewn enough bags that I was able to just wing these. I'm keeping (and already using the one hanging on the door hanger) and the other I donated to a silent auction for our local Dig Pink event. Check out the link!

Friday, October 16, 2009

Goodnight Monkey Baby Quilt

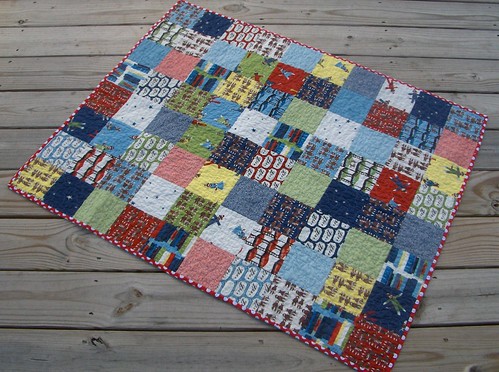
My mom, sister and I are participating in a craft show the Saturday after Thanksgiving. I wanted to have a few simple baby quilts available, so I whipped up this little one last week. I was going to use charm packs, but I found a deal on a Layer Cake and just cut it into 4 pieces. Voila, 4 charm packs. I definitely saved some cash this way! I used two of my sets for this one. I just quilted it with a meandering stitch. Bound in red polka dots.

Friday, October 9, 2009

Blogger's Quilt Festival!


I have to admit that my favorite quilt is usually my latest quilt. Keeping with that spirit....here is my entry for the Blogger's Quilt Festival! I loved the Festival the last time around. I was introduced to so many great quilts and blogs. Thanks Park City Girl for doing this again! Go check out the other entries.


***Thanks for all of your sweet comments! I used the instructions from the September/October '08 issue of McCalls Quilting Magazine. Check it out here. You can find a similar pattern at Pink Chalk Studio Mini Merry-Go-Round That pattern uses a Jelly Roll and a HoneyBun, but it's the same basic technique***

This quilt was made with 2 jelly rolls from the Recess line by American Jane for Moda. It was really simple to put together. No set in seams, whatsoever! (I don't think I would have attempted it if there had been!)

My little guy wanted his sock monkey in one of pictures. I was happy to oblige:)

The whole thing


DQS7, originally uploaded by myittybittyquilts.

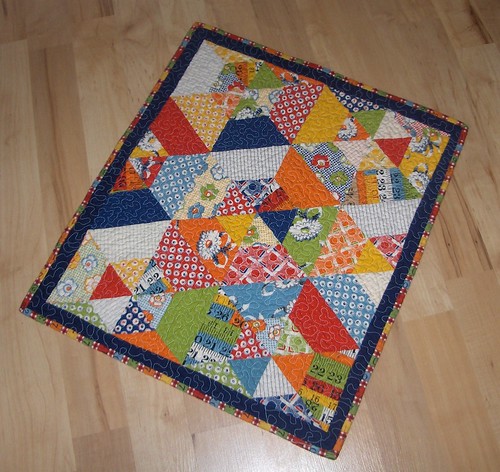
Ok, it's been almost a MONTH since I promised a full view of my DQS7 quilt! I had a ball with this one and I really hope I'll get a chance in the near future to do a full size of this.
I was completely inspired by the quilt that Malka designed for Sew Hip Magazine. First discovered it on Flickr, just look at this lovely one by Red Pepper Quilts!
I just loved it and I was stoked to find out my partner had it marked in her favorites!

Sunday, September 13, 2009

Where did summer go?


DQS7closeup, originally uploaded by myittybittyquilts.

It's been so, so long since my last post, I know. The kids kept me busy all summer. It was cool here in northern Michigan. Not near as much time at the beach as I would have liked, and yet we managed to have lots of fun! Now we are back into the swing of school, volleyball, work, etc....

I have done some sewing. Here is a close up of the doll quilt I made for DQS7. Full picture coming soon.

Thursday, July 23, 2009

Yet another Doll Quilt


Summer Doll Quilt Swap, originally uploaded by myittybittyquilts.

This one is headed to my sister. I've wanted to do a doll quilt swap with her for a while (selfishly, 'cause she's really good!) but it just hasn't worked out until this time.
This is the third time I've done a project with the Recess fabric line and I still haven't tired of it! I love the bright primary colors.
Hope you like it, Joy!

Heather and Denyse Score!

Ok, so, yesterday I went on a little shop hop with my mom and 3 of her sisters. We've been visiting a quilt shop a month in western Michigan and having a ball doing it!
We visited the shop on the hop and I got some more Wonderland and a little Sweet, had a nice lunch at a little cafe that actually had a Blue Plate Special! I couldn't help but order and it was delicious :) Then someone had heard of a shop that had just opened that COULD be on our way home. We thought we'd make the time ;)
The new shop wasn't very well stocked yet and I browsed the books and patterns for a while, but then I got to the back where the fabric was and lo, and behold, sitting on a shelf all by it's lonely self was Heather Ross mushrooms on white! Yeah, I finished off the bolt. Then I started poking through her FQ's and found a few more treasures, all for $2.25 a piece. SCORE!

Monday, July 20, 2009

DQS7 Inspiration


DQS7 Inspiration, originally uploaded by myittybittyquilts.

1. dqs6 received., 2. Thank You Karen!, 3. little house tablerunner, 4. little miss Norah, 5. Forest Pillows, 6. Plain Spoken, 7. Sarah's Tablecloth Quilt, 8. Doll quilt and doll , 9. Doll Quilt Swap I: received

I'm pretty excited to join the oh-so-inspiring Doll Quilt Swap! They are on round 7 and I've been drooling over the creations since it started. I came up with this mosaic to give my partner some inspiration. I realized a few things while I was doing this. I seem to like simplicity in quilts and my tastes are fairly eclectic. I love traditional. I love modern. Iove bright colors. I love browns, grays and oranges. I hope this helps a little!

Thursday, July 16, 2009

Another Doll Quilt!


I've been waiting for a chance to use the adorable whirlygiggle pattern that's floating around bloggy land and here it is! My swap partner at Sewingmamas wanted this for her daughter whose favorite colors are pink and purple. I had plenty of pink, but couldn't imagine that I had near enough purple, but lo and behold, I had plenty thanks to the purple and green quilt I made for a friend this past year. Yay!


Here are some great examples of whirlygiggles on flickr! Enjoy!

http://www.flickr.com/photos/kindredcrafters/3408263280/


http://www.flickr.com/photos/30979645@N05/3322595689/

http://www.flickr.com/photos/11799285@N07/3704111597/

Monday, June 22, 2009

Another Bloggy Giveaway

Sure, I get an extra entry for blogging about this, but really, I love to share a link to a wonderful blog and especially a wonderful blog with a wonderful giveaway :) Too many wonderfuls?


Sheree's Alchemy


Check this out! A huge box of fabric scraps and she sews clothes so her scraps are bigger than us scrappy quilters

Saturday, June 20, 2009

A LONG table runner without a long story


I made this table runner for my cousin Keri and her new husband. They were married today and their ceremony was sweet and casual and my kids LOVED that kind of wedding! It was at a park with a river, playset and there was even a pinata!
Keri really likes 50's era stuff and her table is an antique mint green metal. I immediately thought of the Hello Betty line of fabric by Chloe's Closet for Moda. Just a really simple style, kind of fashioned after the one I made for our table using the tutorial from ModaBakeShop, but this one is obviously much longer, made to hang over the ends of the table rather than sit in the middle.

Isn't that huge red ric-rack fun? I picked it up at the Chicago Quilt Show.

Wednesday, June 17, 2009

A Bag for Emily


Ok, so my dh has been in the Army for the last 6 years and as of today, he is officially done! This is great news for us because he's been gone for 4 of the last 6 years and that's a bit tough on family life as any military family knows. The difficult part now is finding a job, add to that, we live in Michigan. REALLY tough to find a job. This is all to say that money is a tad tight 'round here. So when my daughter was invited to a birthday party this weekend, I knew I needed to come up with something from my stash. A tote bag. Her friend is turning 13 and I know that can be a picky age, but I laid out a few different fabric combos and let my dd pick. Here is what we came up with.

Tuesday, June 16, 2009

70 Blocks Done!


I finished up 70 blocks for the Nine Patch a Day sew-along! I thought I was going to have a bunch extra so I had the option of not using some blocks that are just not going to work. Oh, well. I'll lay them out on the white fabric and if I need to make up some extra, I'll do it.

Thursday, June 11, 2009

Mod Sampler DONE!


Yay! It feels so great to finish a project. I think I've said that before. I really enjoy the whole process, though. This was the quilt along from Oh,Fransson. She did such a great job walking through each step of the process. Check it out!

I've been wanting to do a quilt with pink and turquoise for a while now. I'm not sure why. It matches nothing in my house, but they are so bright and cheery AND I didn't have to buy much fabric. Always a plus, right? I will probably give it to my daughter for her room and she's excited about that.

As you can see, the borders are a bit wavy. That's because I put them on using the LAZY method. YK, just cutting them long, sewing them on and trimming them to the correct length. It just doesn't work well. Lesson learned. I knew better. I'm glad it's just for us so I didn't have to get out the seam ripper :)

Tuesday, June 9, 2009

Design Your Own Fat Quarter Pack Giveaway!

We just love giveaways, don't we? Head on over to The Fabric Shopper and check out the great giveaway. You not only sign up but you get to spend time shopping and designing your OWN FQ bundle from Whipstitch on Etsy!

Saturday, June 6, 2009

Mini Modern Dutch Quilt


I think my favorite part of the quilting process is the last few handstitches on the binding. I just loe to finish a project. Especially if I like results :) This was a fun quilt to put together. I enjoyed working with these colors a lot. The reds, oranges, yellows and greens are what spring looks like around here.

I used a pattern from an old American Patchwork and Quilting Magazine and they were copying a full size antique Dutch Quilt. The traditional Dutch pattern was to have a center unit, usually a pieced star surrounded by small repeating blocks, often the hourglass or bowtie. Of course, I had to update the fabrics a bit, hence the "modern" in the title :) I also read that they almost ALWAYS used a red backing and binding. On this I was happy to oblige since red seems to stay at the top of my favorite color list. I used a cotton/linen blend for the setting blocks and Espresso Kona Cotton for the framed corners.

I sure hope my recipient likes it!

Thursday, June 4, 2009

Patchy Fabric Card Tutorial

Photobucket

So many of you sweetly commented on the fabric cards I made for the swap at SewingMamas and a few of you even asked for a little how-to. I had a LITTLE extra time this week so I thought I would put a tutorial together. Besides, I needed to add some boy cards to my stash so it wasn't too hard to take some pictures while I sewed them up. I'm sure there are tons of ways to do these, but this is the way I like the best after a bunch of trial and error. This project is such a great way to use scraps, even teeny tiny pieces.


1. Gather Supplies

Blank Notecards with Envelopes
Fabric scraps at least as long as your card, can be any width
Lightweight/midweight fusible interfacing
Glue stick"0"
Matching thread

2. Measure the front of your cardstock and cut a piece of interfacing the same size.


3. Cut your fabric scraps into 1"-2" strips at least as long as your card. I like to use 5 per card, but you can do whatever strikes your fancy.

4. At your ironing board lay the fabric strips on the fusible side of the interfacing in an order that pleases your eye, then fuse in place. Make sure at least some of every strip is fused so that when you take it to the machine they wont be moving around. Go ahead and give it a press from the back, too, just to ensure a good bond.


5. Trim the fabric to the size of the interfacing rectangle. Then take to your sewing machine and zigzag along each raw edge, making sure to keep your zigzag more on the "loose" side to be sure you are catching it in.


6. Now, take your glue stick and run a line around the edge on the back of your interfacing rectangle and glue it onto the cardstock. Then take your card back to your sewing machine and zigzag the fabric to the cardstock around the perimeter.


That's it! You've got a finished card. Wasn't that easy? It's even easier to sew up a bunch at once and use chain sewing techniques. These can make a great gift or just keep some to have on hand. Handmade is such a nice touch! Use your imagination and have fun.

As you can see, I "appliqued" one of the funky vehicles on the front of the tall card. If you want to do something like that, just glue your image down and zigzag around it after you've completed step 5.


Enjoy and let me know if you give these a whirl or if I have made no sense at all and you have a question, feel free to ask!