Hi, friends! Well, the move is over and while there are still many, many boxes to unload, I'm so thankful all of our stuff is in one house.
I thought I'd show you all the latest doll quilt for a swap at Sewingmamas.com. The theme was summer.
I used a paper piecing block from quilterscache.com. I enjoyed the process, but I really wouldn't want to do a paper pieced queen sized quilt or anything! I hand embroidered the antennae in brown. My very nice and talented sister agreed to do the quilting for me IF I hand sewed the binding down on her swap quilt :) I really don't mind machine quilting, but I was right in the middle of a move and I had no time or space to get out my machines.
For the binding I pieced together 4 inch strips from the various fabrics in the quilt. I love a pieced binding.
Sunday, July 27, 2008
Ittybittybutterflyquilt
Wednesday, July 2, 2008
Four Patch Doll Quilt Sew-Along Part Three!
Ok, the top is done!
Now go ahead and square up your quilt however you would like (I, of course, don't mean make it a square, but make sure all edges are straight and the corners are 90 degrees)
The next step will be to layer the quilt, batting and backing.
Take your backing fabric and cut it 2" bigger than the quilt top on all sides and then do the same with the batting/flannel.
Next layer your fabrics, backing right side down then batting then quilt top right side up, just like you want it to be when it's finished. Make sure your fabrics are all nice and flat but not pulled out of whack.
You'll need to make sure that your layers don't shift during the quilting. I use a basting spray for doll sized quilts. You can also use safety pins and pin all the layers together about every 3" or hand baste.
To hand baste just use really huge stitches, start in the center of your quilt and stitch outward to the perimeter. You'll kind of end up with a sunburst pattern.
Here is a nice walk-through for pin-basting. http://crazymomquilts.blogspot.com/2...ste-quilt.html
Now it's time to quilt. I used a free motion stipple on this quilt or you could quilt in straight lines with a walking foot. Whatever fits your style.
Whichever method you choose, it's best to start in the middle of your quilt (or start at one edge and stitch to the middle right away) This ensures that you don't end up with lots of extra fabric puckering in the middle.
To free motion in any pattern, you'll need a darning foot for your machine, lower your feeddogs and then start meandering. Make sure that you take a couple of stitches before you start moving your fabric. This secures your stitches.
Practice, Practice, Practice on a couple of layers of flannel!!
If you want to learn from the VERY BEST, watch this video. This lady wins shows and awards all the time for her awesome machine quilting.http://www.needlepointers.com/displa...s/tvt035.asp
Easier than free-motion (although a doll quilt is a great way to get your feet wet with free-motion) would be to do straight stitching. J
ust mark your stitching lines with a disappearing ink fabric pen, put your walking foot on your machine and follow your lines. If you don't have a walking foot, you'll just have to work a little harder at keeping you layers from shifting.
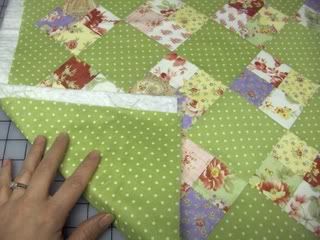
Once it's quilted, cut off the excess batting and backing.
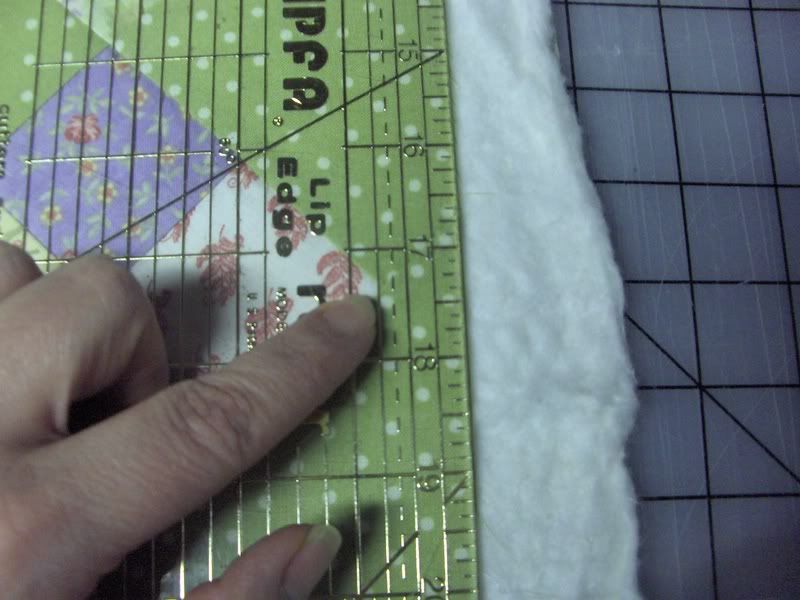
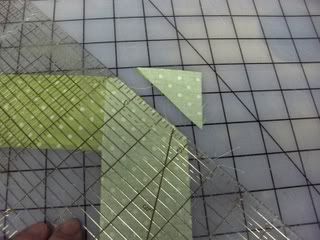
Next we'll need to cut the binding. Cut about 90" of 2 1/4" strips of your binding fabric. I cut these on the straight of grain. Sew your binding together at the short ends. Place two binding strips at a 90 degree angle, right sides together and sew from top left corner to bottom right. Cut off extra fabric.
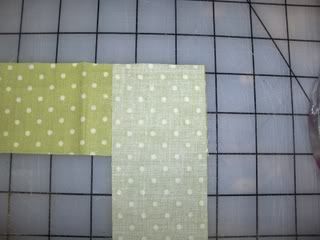
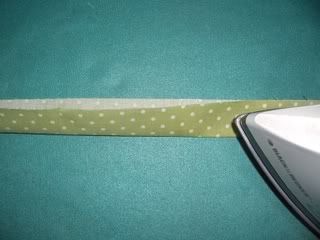
Now you have one long binding piece. Iron this in half lengthwise, wrong sides together.
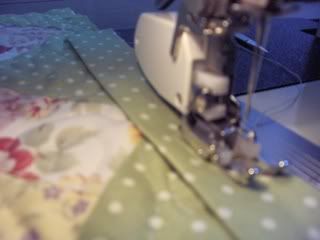
Now, starting at the middle of one of the sides and leaving about a 4" tail start sewing the binding to the quilt, raw edges together, using a 1/4" seam allowance. Sorry about this fuzzy pic.
When you get to the corner, stitch up to 1/4" from the edge and remove from under your needle. Now take the fabric and fold it back away from the quilt. Then fold it back straight across the quilt, right where you want it to got next.
I'm so glad I have pictures. I can't explain this very well!

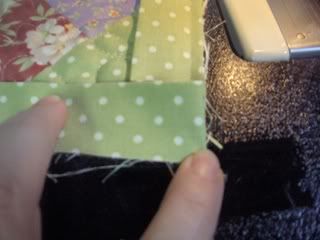
Start stitching again 1/4" away from the corner.
When you get to the starting point, leave about 4" in between your start and finish. Lay your quilt out flat and match up the ends of your binding and trim 1/4" up from the quilt. Open up your fabric strips and sew, right sides together, the two pieces together. Fold them again and stitch them down to the quilt. Please look at this link for pictures of this process. http://www.needlepointers.com/displa...inding-101.htm
Now take your binding and wrap it around to the backside and handstitch it down.
You're done! Don't forget to sign and date it somewhere!
Now go ahead and square up your quilt however you would like (I, of course, don't mean make it a square, but make sure all edges are straight and the corners are 90 degrees)
The next step will be to layer the quilt, batting and backing.
Take your backing fabric and cut it 2" bigger than the quilt top on all sides and then do the same with the batting/flannel.
Next layer your fabrics, backing right side down then batting then quilt top right side up, just like you want it to be when it's finished. Make sure your fabrics are all nice and flat but not pulled out of whack.

You'll need to make sure that your layers don't shift during the quilting. I use a basting spray for doll sized quilts. You can also use safety pins and pin all the layers together about every 3" or hand baste.
To hand baste just use really huge stitches, start in the center of your quilt and stitch outward to the perimeter. You'll kind of end up with a sunburst pattern.
Here is a nice walk-through for pin-basting. http://crazymomquilts.blogspot.com/2...ste-quilt.html
Now it's time to quilt. I used a free motion stipple on this quilt or you could quilt in straight lines with a walking foot. Whatever fits your style.
Whichever method you choose, it's best to start in the middle of your quilt (or start at one edge and stitch to the middle right away) This ensures that you don't end up with lots of extra fabric puckering in the middle.
To free motion in any pattern, you'll need a darning foot for your machine, lower your feeddogs and then start meandering. Make sure that you take a couple of stitches before you start moving your fabric. This secures your stitches.
Practice, Practice, Practice on a couple of layers of flannel!!
If you want to learn from the VERY BEST, watch this video. This lady wins shows and awards all the time for her awesome machine quilting.http://www.needlepointers.com/displa...s/tvt035.asp
Easier than free-motion (although a doll quilt is a great way to get your feet wet with free-motion) would be to do straight stitching. J
ust mark your stitching lines with a disappearing ink fabric pen, put your walking foot on your machine and follow your lines. If you don't have a walking foot, you'll just have to work a little harder at keeping you layers from shifting.
Once it's quilted, cut off the excess batting and backing.

Next we'll need to cut the binding. Cut about 90" of 2 1/4" strips of your binding fabric. I cut these on the straight of grain. Sew your binding together at the short ends. Place two binding strips at a 90 degree angle, right sides together and sew from top left corner to bottom right. Cut off extra fabric.


Now you have one long binding piece. Iron this in half lengthwise, wrong sides together.

Now, starting at the middle of one of the sides and leaving about a 4" tail start sewing the binding to the quilt, raw edges together, using a 1/4" seam allowance. Sorry about this fuzzy pic.

When you get to the corner, stitch up to 1/4" from the edge and remove from under your needle. Now take the fabric and fold it back away from the quilt. Then fold it back straight across the quilt, right where you want it to got next.
I'm so glad I have pictures. I can't explain this very well!


Start stitching again 1/4" away from the corner.
When you get to the starting point, leave about 4" in between your start and finish. Lay your quilt out flat and match up the ends of your binding and trim 1/4" up from the quilt. Open up your fabric strips and sew, right sides together, the two pieces together. Fold them again and stitch them down to the quilt. Please look at this link for pictures of this process. http://www.needlepointers.com/displa...inding-101.htm
Now take your binding and wrap it around to the backside and handstitch it down.
You're done! Don't forget to sign and date it somewhere!
Subscribe to:
Posts (Atom)